A bowtie diagram is a risk analysis tool that maps the relationship between a hazard, the event where control is lost (the “top event”), and the consequences that follow, with barriers drawn on each side to show what prevents the event and what limits the damage if it occurs. The shape resembles a bowtie: threats fan out to the left, consequences fan out to the right, and the top event sits at the knot in the centre.
Organisations in oil and gas, aviation, mining, rail, cyber security and dozens of other sectors use bowtie diagrams because they do something no spreadsheet risk register can: they make the logic of risk control visible at a glance. A team looking at a bowtie can immediately see which barriers protect them, where gaps exist, and what happens if a single control fails.
Why bowtie diagrams matter
Traditional risk assessments (5×5 matrices, HAZOPs, tabular registers) capture data, but they bury the causal chain. A bowtie diagram surfaces it. That matters for three reasons:
Communication. A single bowtie can replace pages of a risk register when briefing operators, regulators, or board members. The visual format requires no specialist training to read.
Gap identification. When barriers are drawn explicitly, missing controls become obvious. If there is only one barrier between a threat and a top event, the diagram forces a conversation about whether that is acceptable.
Assurance. Each barrier can be linked to performance standards, inspection schedules and KPIs. This turns the bowtie from a static picture into a living assurance framework, which is how leading operators in process safety use it today.
The 6 core elements of a bowtie diagram
Every bowtie diagram is built from six elements. Understanding these is the foundation for building, reading or auditing any bowtie.
1. Hazard
The hazard is the source of potential harm: an operation, material or condition that could lead to an unwanted event. It sits at the top of the diagram, above the knot.
Examples: hydrocarbons under pressure, a vehicle in motion, sensitive data stored on a server, work at height.
A common mistake is confusing the hazard with the top event. The hazard is the context : the thing that makes the scenario dangerous. It exists whether or not anything goes wrong.
2. Top event
The top event is the moment control of the hazard is lost. It is the “knot” of the bowtie, the central point from which the two sides diverge. No consequences have been realised yet at this point, but the situation has become uncontrolled.
Examples: loss of containment (hydrocarbon release), dropped object, unauthorised data access.
The top event should be defined precisely. “Fire” is not a good top event, it is a consequence. “Release of flammable material to atmosphere” is the loss-of-control moment that could lead to fire.
3. Threats
Threats sit on the left side of the bowtie. They are the causes or initiating events that could lead to the top event. Each threat gets its own pathway, branching out from the knot.
Examples: equipment failure, corrosion, human error during maintenance, external impact, malicious attack.
A well-built bowtie typically has 4–8 threats. Fewer suggests the analysis is superficial; more than 10 often means threats are being split too finely or the hazard scope is too broad.
4. Consequences
Consequences sit on the right side. They are the undesirable outcomes that could result from the top event if mitigative barriers fail.
Examples: injury to personnel, environmental contamination, asset damage, regulatory penalty, reputational harm.
Consequences should be specific enough to drive different mitigation strategies. “Bad outcome” is useless. “Toxic exposure to on-site personnel” and “off-site community evacuation” drive very different barrier sets.
5. Barriers (preventative and mitigative)
Barriers are the controls placed along each pathway to either prevent the top event from occurring or limit the severity of consequences once it has occurred.
Preventative barriers sit between threats and the top event on the left side. Their job is to stop the causal chain before control is lost.
Mitigative barriers sit between the top event and consequences on the right side. They accept that the top event has occurred and focus on limiting damage.
Examples of preventative barriers: pressure relief valves, permit-to-work systems, automated shutdown systems, access controls.
Examples of mitigative barriers: emergency response plans, fire suppression systems, spill containment, backup data systems.
A good barrier must be independent (it works on its own, not relying on another barrier in the same pathway), effective (it materially reduces the likelihood or severity), and auditable (you can verify it is working).
6. Escalation factors and escalation barriers
No barrier is 100% reliable. Escalation factors are the conditions that can degrade or defeat a barrier. Escalation barriers are the controls put in place to prevent that degradation.
Example: If a barrier is “emergency exits”, an escalation factor might be “exits blocked by stored materials.” The escalation barrier would be “regular inspections of exit routes” or “staff training on keeping exits clear.”
This layer turns a bowtie from a theoretical model into a practical assurance tool. It forces teams to ask: “What could stop this barrier from working, and what are we doing about it?”
How to build a bowtie diagram: step by step
Step 1 — Define the hazard and top event. Start with the hazard your team manages. Define the top event as the specific moment control is lost. Get this right and the rest of the bowtie flows naturally. Get it wrong and every barrier will be misaligned.
Step 2 — Identify threats. Brainstorm the causes that could lead to the top event. Use incident data, HAZOP outputs, near-miss reports and expert judgement. Group similar causes and aim for 4–8 distinct threat pathways.
Step 3 — Identify consequences. Map the range of outcomes if the top event occurs and mitigative barriers fail. Think across categories: people, environment, assets, reputation, regulatory.
Step 4 — Place barriers. For each threat pathway, identify the preventative barriers. For each consequence pathway, identify the mitigative barriers. Each barrier should be a specific, verifiable control, not a vague aspiration.
Step 5 — Add escalation factors and escalation barriers. For each critical barrier, ask: “What could make this fail?” Then identify what controls exist to prevent that failure.
Step 6 — Validate with the team. A bowtie built in isolation is a hypothesis. Walk the diagram through with operators, engineers and safety professionals who work with these hazards daily. Challenge every barrier: Is it really in place? Is it really effective? When was it last tested?
Bowtie diagrams vs other risk assessment methods
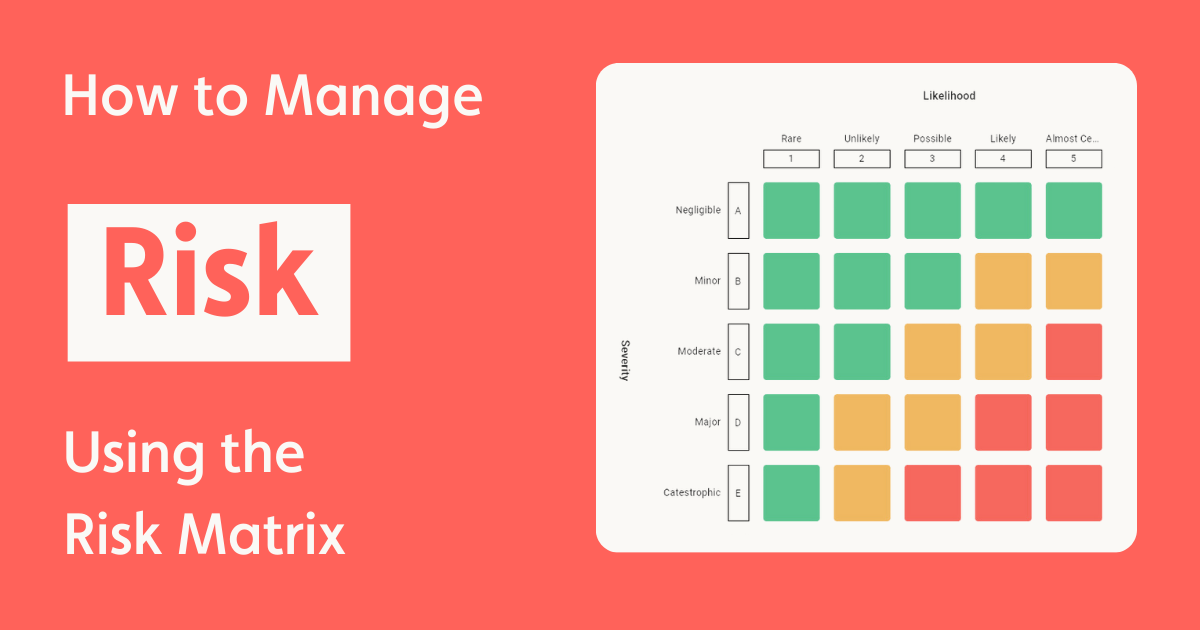
Bowtie diagrams complement rather than replace other methods. A HAZOP identifies hazards; a bowtie visualises the barriers around them. A risk matrix scores likelihood and severity; a bowtie shows why that score is what it is.
The bowtie method is referenced in ISO 31000 (risk management) and is a core tool in process safety management frameworks used across the energy, transport and mining sectors. It is particularly strong where organisations need to demonstrate barrier-based risk management to regulators — which is increasingly the norm in major hazard industries.
Common mistakes when building bowtie diagrams
Confusing hazards and top events. “Fire” is a consequence, not a top event. The top event is the loss of control that precedes it.
Too many threats on one bowtie. If you have 15+ threats, your hazard is probably scoped too broadly. Split it into two bowties.
Barriers that are not independent. If barrier A depends on barrier B to function, they are really one barrier with a dependency. The bowtie should reflect this honestly.
No escalation factors. A bowtie without escalation factors is incomplete. It assumes all barriers always work, which contradicts the purpose of the exercise.
Static bowties that are never reviewed. The value of a bowtie is in keeping it current. Barriers change, new threats emerge, incidents reveal gaps. A bowtie that was built three years ago and never updated is a false comfort.
Industries that use bowtie diagrams
Bowtie diagrams are used across any sector that manages major accident hazards or complex operational risks:
- Oil and gas — process safety, well control, pipeline integrity
- Aviation — flight safety, ground operations, maintenance risk
- Mining — ground control, tailings management, vehicle interactions
- Rail and transport — derailment prevention, level crossing safety
- Cyber security — data breach prevention, system access control
- Utilities — gas distribution, electrical safety, water treatment
- Marine — vessel operations, cargo handling, port safety, collision and grounding prevention
Next steps
If you are building your first bowtie or looking to improve how your organisation manages barrier-based risk, these resources will help:
- Bowtie diagram examples by industry — see real bowties for oil and gas, cyber security, aviation and more
- Free bowtie diagram template — download an Excel or PowerPoint template to get started
- The 6 bowtie diagram elements explained in detail — a deeper dive into each component
- Bowtie risk assessment: the 7 essential elements — how to extend a bowtie into a full risk assessment framework